Showing posts with label Urban Gardening. Show all posts

Thursday, December 17, 2015

Think Before You Say "Gross" to Compost


"Can you show me how to do the compost bin?" Megan, my roommate, asked yesterday as she pointed to the compost bag filled with vegetable scraps and coffee grounds that I'd hung (conveniently, I thought) from a knob on our kitchen counter. "It's, um, leaking all over the floor."

"I'll take it out!" I chirped, excited to lay down another layer of scrap on my growing pile of decomposition.

It's my masterpiece.

I slipped on some shoes and walked out to the side of the house, where my compost bin sits in partial shade. Megan followed, eyeing the leaky bag in my hand.

I removed the lid of my bin and dumped the bag of what would otherwise be considered "trash" onto the mostly rotten, stinking pile.

Megan took a step back. "So, uh, what's the point of composting, anyway?"

I realized I hadn't really explained the purpose of my growing work of art, and I'm willing to admit: it's not the prettiest (or the most pleasant smelling) thing I keep myself busy with.

But the truth of the matter is that composting is one of the best activities for living a green and sustainable lifestyle. There are so many benefits to having a compost bin at home, whether you are have a backyard garden or not.

In this post, I'll be outlining some basic types of compost systems and listing the reasons for setting one up.

First and foremost, what is composting? 

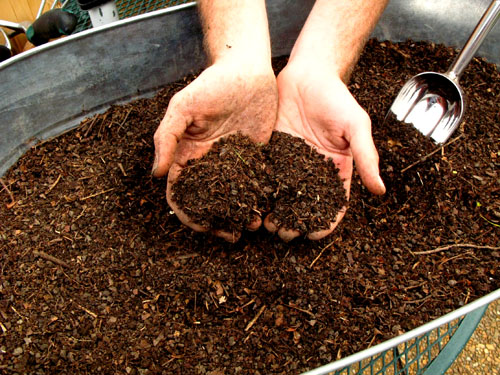
Composting is the process of turning decomposed organic materials into nutrient-rich soil, often used as garden fertilizer, known as compost. 

Reasons for Composting

Composting reduces the amount of waste you send to the landfill. Let me repeat that: compost reduces the amount of "waste" you send to the landfill. What our society often considers "waste" isn't waste at all— it can be repurposed. You can compost more than just fruit and vegetable scraps. Paper, cardboard, scrap wood, sawdust, yard trimmings, leaves, egg shells, and coffee grounds are just a few examples of things you can recycle.

Why should you care about landfill waste? Landfills get a bad rap. They're not bad in themselves, but it's the amount of waste that gets sent to them that's bad. All the stuff in landfills represents a loss to the environment and the economy. As much as 50% of landfill space is taken up by paper, something that can be broken down naturally in your backyard. Biodegradable materials like paper and vegetable waste don't break down naturally in landfills because they require other living organisms to fully decompose and return to nature as the building blocks for new life. Landfills are simply packed with too much "garbage" for this to happen.

Composting turns your waste into a natural product. You won't need to buy as much (if any) fertilizer for your garden once you start a compost system. And if you don't garden, there's plenty of people who do, people who will be happy to take it off your hands.

Composting provides you with a lesson about the bad habits of our society and lets you have an active hand in breaking them. We're a materialistic creature, we humans, and it's a part of who we evolved to be. But there's ways to consume without overconsuming, and leaving a trail of waste behind us for the earth? future generations? to clean up. Let's break the cycle now! If you think that because you're just one person, you won't make much of a difference, I'm here to tell you that you're wrong. Our lives are entirely made up of the decisions we make, and those decisions impact others we meet. You never know how your actions can potentially influence someone else.

Are you convinced yet? Great!
Now, we'll talk about the types of compost systems.


Types of Compost Systems 

Heap: A heap is the most basic outdoor composting method. It costs almost nothing and is super low maitenenence. There are some downsides, though. Because a heap is an open air system, you lose heat, which means a slower decomposition rate. It's also unsightly, so unless you have a corner of the yard where you can tuck it and let it be, I'd invest in a different system.


Plastic Holding Bins: This is the kind of compost system I have. They're a bit more expensive, but they're compact and prevent animals from getting into your pile.They're easy to move around and the plastic reduces moisture loss. On the flipside, though, is the limited holding capacity. Plastic bins won't work for bigger gardens.


3-Bin Turning System: These are the Rolls Royce of outdoor compost systems. They produce compost fast, and they produce a lot of it. They're perfect for large yards and gardens. This system takes a bit of work when building, but the result is durable and long-lasting. On the downside, it requires a bit more space and commitment, because you have to follow strict composting guidelines in order for this to work.


Worm Bin: A great indoor alternative, worm bins are perfect for apartment dwellers or people who don't have a ton of outdoor space to work with. A longtime friend who now lives in New York actually has a worm bin compost system at the bottom of her pantry. As unappealing as this sounds, it's actually a far better system than dragging your waste to the curb to rot while awaiting garbage pickup. These are small and inexpensive to maintain, and don't require too much commitment or extra work.


So there you have it, an introduction to the reasons for and systems of composting! Please share your experiences with and/or any tips for composting in the comments.

Additionally, please comment and let me know if you'd like additional information on any of the systems I've talked about in this post. I'm happy to help with questions or concerns!

Tuesday, November 24, 2015

Container Gardening: Never Buy Store Bought Garlic Again!


My Nashville house is a mansion compared to some of the apartments I had in Chicago, and if you would've told me a year ago that I'd have not only a backyard, but a porch and garage too, I'd have laughed in your face and then apologized immediately because laughing in people's faces is mean.

So the days of container gardening are long behind me but hey, I have a sunroom now too and there's bugs outside, and garlic doesn't take up that much space. With just two small 6 inch pots, you can grow 10-15 bulbs for the price of just one bulb of organic garlic. 


Separate your cloves, but don't worry about pulling the papery skin off. Each clove will produce one bulb, and the size of the bulb is proportionate to the size of the clove. Bigger cloves = bigger bulbs (I want to make a joke here but I won't because I haven't thought it out entirely but just know the intention was there.)

So, pick bigger cloves to plant. 

Fill up your pots almost to the rim with soil. Basic organic potting soil works. Honestly, if you're not trying to win Best Garlic at Your Town County Fair it doesn't really matter what kind of soil you use, as long as it's not completely dried out and devoid of nutrients. Garlic is a hardy plant and will grow regardless.


Pop your cloves in about an inch apart from each other. Put the flat part down (that's where the roots come from) and the pointy end up.  They'll grow depending on how much space you give them — the more the better, but unless you're trying to repel some creepy vampire-looking dude staring in your window you probably don't need that much garlic. If you do, get some more pots and bulbs and a restraining order.


Here's Pete, my cat, after he inspected to make sure I did the job right.
Cover them up with a loose layer of soil. Call Pete to keep an eye on them. He charges $50 an hour but will make sure nothing bad happens.

Rome wasn't built in a day, Pete.

After about a week, you'll start to get tiny shoots sprouting from the cloves.


And after a week and a half, you'll notice more. GAME ON, your garlic is on its way.

I decided to repot them after 2 weeks, because a little white cat decided digging up the cloves would be SO FUN.

If you do decide to repot, be careful, because the root structure should be pretty strong. Here's what mine looked like (super healthy, with long and thick white roots.)


You can trim down the green shoots for bigger garlic bulbs; when you trim them, the plant puts all its energy into developing the good stuff. You can also use the green shoots in cooking— they have a milder taste, but still give meals a kick.

It'll take 4-6 months for your bulbs to develop fully, but be patient. You can replant cloves you've taken off your bulbs for more garlic. Never buy the store-bought variety again! 

The best part is you don't need a lot of space to do it. Garlic is a cold-hardy plant so it can be planted over the winter for early summer bulbs, or indoors in containers during any month of the year. 

Monday, November 23, 2015

Backyard Gardening: Healthy & Sustainable


If you'd have asked me, even a few years ago, if I ever thought I'd be writing a blog on the benefits of growing my own food, I'd have laughed and asked what you were smoking. I had the idea that many people have: that gardening and compost are icky, reserved for peasants and farmers. I'd have insisted that I was fine buying most of my "fresh" produce from the grocery store. Ah, the clean, glistening aisles of the grocery store, where we can pick up and purchase what is labeled as a "fresh" tomato, without so much as seeing a blemish or a speck of dirt! 

...but what's really going on underneath that so-called cleanliness?

The truth of the matter is that local or homegrown organic produce is not only more nutritious but also better for the environment. They are free of pesticide residue and simply just taste better. Have you heard that adage about homegrown tomatoes? The idea that homegrown tomatoes taste better than their store-bought relatives is true.

One of the most important lessons I've learned in life is that a societal acceptance of an idea doesn't always mean that that idea is the best for society. Generally, people tend to accept beliefs that are comfortable, assuming that those beliefs are the right ones. We've seen this time and time again throughout history: everybody's milling about doing one thing until something better comes along and all of a sudden everyone's doing it that way. Take the industrial revolution or Henry Ford's assembly line production as two examples of this evolution. Instead of evolving physically, we're evolving mentally. And that's great. 

We see these patterns a lot in food and nutrition, especially in the last twenty years or so, since people began relying less on fresh, home-cooked meals and more on prepackaged or heat-and-serve meals. The 2000s brought an explosion of health food products, and now it seems we can find products that used to be unheard of (e.g. Veganaise, coconut milk) at most well-stocked grocery stores. Great! 

We're attracted to words like "natural" and "chemical-free," because we all want to take care of ourselves and live long, happy lives. More and more people are beginning to wake up and take control of their food choices and ultimately, their health. 

But wait a minute... is the wool still being pulled over our eyes? What if we don't always need these health food companies to produce the products that we're enjoying as deliberate and health-conscious humans? The object of any business is to make money and stay in business by convincing everyone that their products are necessary. Sometimes, they are. (I'm not going to go and make vegan cheddar cheese– I'll leave that to Daiya.)

But what I'm saying is, why buy organic produce if you can grow it yourself, and have even more of a hand in where your food comes from? If we're really concerned about the process in which our food gets to our table, wouldn't we want to make that process as transparent as possible?

If you say time is an issue, think of how long it takes to drive to the grocery store, choose your items, and wait in line. Setting up and maintaining your garden or hydroponic system takes half that amount of time, if that.

If you say money is an issue think of the amount you already spend on organic or treated produce ($1.99 per pound of tomatoes?), and then ask yourself: how much of that goes bad? Nature is abundant! Think of being able to walk out your door, into your yard or patio, and having more than you can possibly eat to choose from. Your neighbors and friends will love you, too, and who doesn't love love?

And once you get going with your bad, sustainable self, you'll learn so much and get so much more than what you bargained for, in all the best ways! Nature (and all of life, really) moves in cycles. Your produce is fed by sunlight and organic nutrients in the soil, which you can add to by composting biodegradable, natural products (like eggshells and coffee grounds) and plant waste. These items, which make up 20-30% of all of our waste, realistically should break-down once they're returned to the earth, but unfortunately the landfill system in effect doesn't make it so easy. In addition, when we take an active stance in waste management, in a way that's more hands-on than simply sending off our paper and plastic to recycling, we're able to see the whole metamorphic cycle of "gross" food scraps into a dense, nutrient-rich resource.

It really gives perspective to how often we rely on the concept of "out of sight, out of mind" to rationalize our choices.

By choosing to grow some of your own food, you're not only benefiting your health, but the earth as well! Gardening can be a pleasant experience for anyone, regardless of how big or small a space you have to work with. It's extremely rewarding when you pick your first baby eggplant or make salsa not only from scratch, but from home-grown scratch. Even if you don't have a green thumb, there are plant varieties that are easy to grow and very forgiving. 

In the coming weeks, I'll be posting more about gardening, both in containers and in outdoor beds. Other health and environmentally sustainable topics (like a more in-depth post about DIY composting) will be covered as well.

Remember: the earth is naturally abundant. Give it a chance to grow! 

Wednesday, November 18, 2015

DIY: Simple Raised Garden Beds for $25


My love for gardening has grown over the years as I've learned more about nutrition and where my food comes from. Michael Pollan's 2006 release of The Omnivore's Dilemma was one of what I consider a flagship book for me. A big chunk of the book talks about the author's attempt to raise and/or grow every ingredient necessary for a dinner: he cultures yeast for bread; he grows vegetables and herbs; he picks wild mushrooms; he hunts a wild boar. It was an expose of what really goes into preparing a home-cooked meal, and also made me question what our society considers "food." 

I began gardening with a kitchen window herb garden. It wasn't much, but it allowed me to have a few fresh things to add to my meals, things I knew hadn't been genetically modified or touched by chemicals. Every season, I'd let the plants flower and collect seeds to replant again. Only a few times in the last few years have I bought basil, cilantro, parsley or chives at the store. 

Naturally, that progressed into wanting to grow more of my own food. Since such a huge chunk of my diet is fresh vegetables and because I cook most of my meals, it was inconvenient (and sometimes, pricey) to have to run to the store every other day to restock my produce bin. I decided to venture into vegetable gardening, because it was an inexpensive way to get high yields of quality, organic produce. 

In Chicago, I was able to grow a lot in containers. I sort of had to, considering my apartments never had lots of space. Container gardening is a great way to dabble in growing your own food while in a small space, and it's fairly easy! You can grow lots— peppers, tomatoes, cucumbers, mini varieties of nightshade vegetables like eggplant, salad greens— you name it, and it can probably be done. But when Megan and I were looking for houses in Nashville we knew we wanted one with outdoor space. My main reason was to have a garden.

True, it's fall, but it's never too early to get things done, which is why this past weekend, while Scott was visiting I asked for help building raised garden beds.

Initially, I was going to buy two pre-assembled beds. I told Scott my plans. The conversation went something like this:

"I'm going to buy some raised garden beds." - me 

"You're going to buy garden beds?" - Scott

"Uh, yeah." - me

"How much are they?" - Scott

"Like, $120 or something each, I don't know." - me 

"Are you insane?" - Scott

Which is how I found myself en route to Home Depot, aka my favorite store (seriously— Megan and I have been there so many times since we moved that we know a few employees by name) and then in the lumber section, stacking boards on a cart as Scott handed them to me.

I ended up with two 4x4 beds, but for this post I'll be giving you instructions and a material list for just one. I like to grow a variety of veggies and herbs, but if you're just looking to have a few things at your disposal, you don't need a ton of room. Nature is abundant; you'll have more than you need if you're just gardening for you (get ready for your neighbors to be your best friends.) If you have more mouths to feed than just yourself, you may want to consider a bigger plot.

What you'll need:
  • 2 2x12 (each cut in half)
  • 1 2x4 (cut into 4 pieces)
  • sledge hammer
  • drill
  • wood screws
  • tape measure
  • wood saw (optional; you can always have the nice fellas at the hardware store cut the boards for you. Usually it isn't more than $0.75 per cut.)
How to do it:

Gather your materials.


Cut your 2x12s in half if you didn't have it done at the store.


Measure your 2x4 into 4 equal pieces, and cut. Then, cut a "V" at the top of each piece (this doesn't have to look pretty— it's going into the ground.) These are your stakes.


Assemble your bed using the 4 pieces you cut from your 2x12. We drilled two wood screws into the top and bottom of each piece, but you can use more if you want extra support.


Drive your stakes into each corner using your sledge hammer, and attach with wood screws.


Pull the weeds out. Because I don't plan to plant anything until next season, Scott suggested I put down cardboard and cinderblocks to kill all the resident weeds and plants in the beds. Nashville is home to a plant called Creeping Charlie, a perennial ground creeper that invades EVERYWHERE. I wanted to nip it out long before sowing season.


That's it! The supplies should cost you about $25, provided you already have basic tools like a hammer and drill. 

Raised beds are beneficial if you're choosing to grow your own food because they provide good drainage and block certain garden pests from destroying your plants. They tend to make weeding easier (and you have to do it less, because it's harder for them to grow.) Your soil won't wash away during heavy rains, and the beds prevent it from compacting. It's so worth it to invest in these and dedicate half a day to building them. Your health will thank you later :)